Tuesday, December 31, 2013

2013, Year of the Man Cave

I havent posted for a couple of weeks, because a huge project here in the house has been drawing to a close. My wife, Kimberley, and I decided some months ago that a major home renovation was in order. We had an unfinished basement, and it was time to turn it into a finished basement. Besides the wine cellar and bathroom that would go in...I'd get a new game room...YES!

We engaged a contractor and framing started a couple of months ago.


Here was one corner of the basement that would turn into my new boardgame center.


Mmmm, framing and drilling...yay.


An early view of the new man cave.


Drywall appears!


The boardgame nook gets custom shelves.


Seen to the right is a custom shelving area where my Warmachine armies would eventually live.


 Reverse angle...lighting is in and working.


 Paint is up and under-padding for the carpet is in.


And now the carpet appears. Sweet.


 The boardgame nook is ready to be filled.


And now it is! Awesome. It felt great to unload all those cardboard boxes that had been sitting in the garage for the last few months.


I had a couple of new game tables commissioned. The 6'x4' is on the floor in the background here, waiting for its legs. However, the 8'x4' table is up...I couldn't be happier. I had it built to bar-top height, so it feels really big.


Looking back into the magazine corner.


The entranceway to the new man cave...


My Warmachine armies are now in their new shelves.


A view of the main part of the room.


And a close up of my WWI panes. Shelves also house several historical, fantasy and sci-fi armies.


And plenty of periodicals and game supplements...and game terrain.


Well, there it is...the last great project of 2013. Setting up the room has taken some time, as you can imagine. Can't wait to have my first game down there.

Happy Hew Year's Eve, everyone. Hope you had a great 2013.

'Til next time.

Sunday, December 15, 2013

Cloth and Metal Workshop at the LGS

Last Thursday, I ran the third and final painting workshop up at Thunderground in St. Albert. This time around we concentrated on painting cloth and metal.


We started off with a discussion on the behaviors of certain colors, and then moved on to some of the major differences between the major hobby acrylic paint manufacturers. For cloth, we covered the basics of layering and blending techniques. For the metals, we focused on wet-brushing, using appropriate-colored washes, and finally, dry-brushing.

This series of workshops has been very fun to put on, and many thanks to the LGS owner, Roy Kim, for giving us space and providing support.

Sunday, December 8, 2013

Aiyana and Holt...and another Workshop at the LGS

The holidays are just about here...which will mean some serious hobby table time. Don't know what the Christmas project will be yet...we'll see. Anyway, this weekend I finished off Lady Aiyana and Master Holt, a Mercenary Character Unit. I had started them many weeks ago, but they kind of stalled out at the skin stage.


Holt is pretty much painted from his Privateer artwork, but with Aiyana I wanted to add in a few more colors to try some stuff out (and tie her closer to Holt with the blue base color).


Last Thursday night I ran another painting workshop up at the LGS, Thunderground, in St. Albert. Roy had the tables set up for us, and this week we worked on skin. We hit caucasian, zombie and goblin skin during the couple of hours we were there.


Well, this turns out to be post number 250 for this blog, and the Hobby Table has had more than 300K pageviews since starting up a little over three years ago. Thanks to all of you for peeking in once in a while. I appreciate the comments that come in, and look forward to posting another year's worth of hobby and game articles in 2014.

Now, let's see what we can knock off before the end of the year.

'Til next time.

Saturday, November 30, 2013

Basing Tutorial at the LGS...and Kell Bailoch

This past Thursday evening, I drove over to the LGS and put on a basing workshop. I had a lot of fun, and it seems that the guys involved enjoyed themselves.


This lineup of Cygnar Rangers and a few solos shows the steps involved in basing a figure. From left-to-right, the steps are: 1) figure glued to base, 2) glue sand to base, 3/4) prime and ink-wash the figure, 5) paint dried sand dark brown, 6) drybrush sand orange-brown and off-white, 7) go ahead and start painting your figure, and 8) when the figure is done and sealed with Testors Dullcoat (and the outer rim of the base is painted black), then glue on some static grass.

I've detailed a similar method with an already-painted figure in this post.


I only finished off one model this week, Kell Bailoch. He's a pretty popular sharpshooting Warmachine solo.


When I started working on him some time back, I had inadvertently "snowed" his primer coat. The only way to save the figure was to use dark colors and hope no one gave it a really close inspection.


'Til next time.

Wednesday, November 27, 2013

pBaldur vs Harbinger

Well, here's an embarrassingly short battle report. Elliot came over Tuesday night for a game of Warmachine. He brought a pBaldur list, while I trotted out the Harbinger (first time in about 4 years). I rolled up "Close Quarters," and you can see the flag placement on the table here, along with the opening set ups. I'm Menoth on the right. Elliot is Circle on the left.


My list consists of Harbinger, Hierophant, two Reckoners and a Devout in the battlegroup. Then the rest of the list is Avatar, Choir, Vassal, Vilmon, Covenant, Rhupert and Errants with UA. I've rolled to go first.


Elliot is playing the pBaldur tier list, with Megalith, Wold Guardian, Woldwarden, Woldwatcher and Woldwyrd in the battlegroup. Then he had two units of stones (one UA), Mannikins, two units of Woldstalkers and a Wilder. Elliot goes second.


Menoth turn 1. So here's the crux of the game...we're playing a scenario with Kill Box, so I'm forced to move up with Harbinger. Elliot is playing an army with lots of Advance Deploy, Advance Move and plenty of place effects. He's up close right out of the starting gate. I've set up Harbinger on my left to go after the friendly flag. I feat on the top of turn one just to give me a chance to move up my line of engagement. I move up my Errants on my right flank with flame attacks (from the Covenant) and Tough from Rhupert. I want to start the attrition early...but I miss all my crossbow shots by about a quarter inch. Hmmm.


Circle turn 1. Elliot shifts all of his 1-hit units away from the feating Harbinger, and starts shooting at my Errants (he kills 3) and Vilmon (who I Martyr twice). A couple of Mannikins turn into trees (as you can see, Elliot made some great templates for them).


On my left flank, opposite my battlegroup, Elliot moves up his heavy hitters. He takes a few points of damage from the feat, but gets some Earth Spikes off on a Reckoner, knocking out its gun. Baldur teleports into the forest in front of me (that's bad news).


Menoth turn 2. I load up my Reckoners to take out Elliot's Wold Guardian with Crusader's Call. Avatar moves up and Gazes, in an effort to pull the heavies away from Harbinger. Errants set stuff on fire.


Circle turn 2. And...it's the end of the game. Megalith stone-teleports up (avoiding Gaze effect) and puts DEF debuff on Harbinger. Then Baldur tree-teleportsup to Harbinger (no Defensive Strike from Devout) and uses his 4 Fury to beat Harbinger into the ground. Well played Elliot!


Well...not to entertaining to read about...this was a pretty standard pBaldur assassination run, and the Kill Box scenario played right into his hands. Oh well...it's fun to get some old miniatures out onto the table anyway!

'Til next time.

Saturday, November 23, 2013

Step-by-Step Skeletons, Alexia and the Risen, and more

So, my last project for our local Journeyman League was a large unit. The requirement was to paint a unit of at least 10 figures. Well, I had Alexia and the Risen sitting around. Now, Alexia starts the game with 9 Risen in play...but she can accumulate up to 20 by gathering corpses. The box set comes with 10 undead, so I figured an interesting project would be filling out the rest of her Risen with spare undead models I had sitting around from Mantic and Lord of the Rings. Then, adding in a couple of her Thrall Warriors, I was able to submit a 23-man unit for the last painting challenge in the league. 

And, here they are...Alexia and the Risen. 


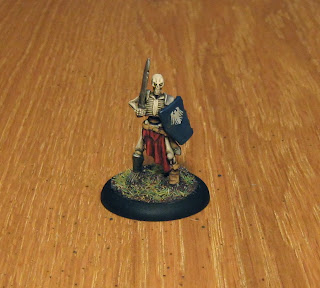
Now, there are a lot of skeletons in this unit, so I'm going to take this opportunity to add a skeleton painting tutorial into this post. First off, skeletons are fun and easy to paint.

Step 1. After assembly and basing, prime white and add a dark wash.


Step 2. Apply a very thin layer of dark bone color. I use the Reaper bone shades...starting with Bone Shadow.


Step 3. Build up layers of lighter colored bone shades (Aged Bone and Polished Bone in this case), and then blend all the layers together with a sepia wash.


Step 4. I applied the last bone highlight layer later in the painting process...actually, it was one of the final steps. I was trying to gage how much I needed the bone color to pop out on the game table after I had the rest of the figure painted. Anyway, the final highlights were painted on with a very thin layer of ivory. As always, you want to just hit the raised features with your highlight layer. This enables the stark bone to really be visible on the tabletop.


Step 5. In any event, back to the rest of the figure. After the initial bone colors are down, I moved on to metal. This is a layered process as well. Shadowed Steel goes down first...then a careful drybrush of Chainmail, followed by a wash of Umber.


Step 6. After the wash dries, a final highlight of metal is drybrushed on (Chainmail and Mithril Steel from the old GW line of paints).


Step 7. Last comes the clothing and leather. I chose red cloth for the figures, to give them a unified and ominous look. All the belts, collars, boots etc. got hit with leather brown. The reds and browns were layered as well to add as much depth to each figure as possible. Then finished the basing, and that was that.


Here is Alexia with the 10 Risen that come in the box. I did some head swaps to add variety to the limited number of poses.


And here are the additional 10 undead figures...most are Mantic skeletons, but there are a couple of Lord of the Rings figures in there as well.


I also did two Thrall Warriors, as Alexia has the ability to generate one of these solos per round.


For our Journeyman League we were also challenged to paint a unit attachment. So, I did a quick Gun Mage Officer figure for Cygnar.


 All in all, a pretty productive week at the hobby table.

'Til next time.

Saturday, November 16, 2013

Blackfrost Shard and 50mm Objective

The Blackfrost Shard is Legion of Everblight's 3-man character unit. Again, I was painting this week for the Journeyman League's painting challenge. All shard members can cast Ice Bolt and Ice Cage, and are weapon masters with magic claymores.


Here's a closer view of Rhylyss. Among the standard Blackfrost abilities, he can cast the Kiss of Lyliss damage buff.


This is the unit leader, Sevryn, who has the Disbinding special ability.


And finally, there is Vysarr, who gives the unit Stealth.


The stretch goal for this week's painting challenge was to prepare a 50mm objective marker. Again, I used a piece from Scibor miniatures' Dwarf Ruins set. Makes a good monolith objective.


Next up...Alexia and the Risen.

'Til next time.